
Alert Box
Notification Box
Scanning Images/Text and Simple Image Editing
Activity 1: Scan a text document Using Omni Page:
1. Turn on the printer/scanner ON.
2. Open the scanner bed lid and place the document face down on the scanner bed, with the top left corner next to the ARROW then close the scanner bed lid.
3. Open the OmniPage Pro. (Located in Start Menu>>Programs>>ScanSoft Omnipage Pro 14.0>> OmniPage Pro 14.0
4. Locate the workflow bar towards the top of the screen. (A bar with 4 drop-down menus) (See below)
5. The first drop-down menu should say “1-2-3” (See below)
6. In the second drop down-down menu, select SCAN. (See below)
7. The third drop-down menu should say “Automatic”(See below)
8. The fourth drop down menu should say “Save to File” (See below)
9. Click the giant 1-2-3 button to initiate the automatic processing in the Workflow bar. (See below)
Workflow Bar
Image

10. Wait a few moments for the scanner to initialize.
11. The box showing the preview of the scanned image of the document should open
Image
12. Optional: Adjust the image by using the corner selectors.
13. Optional: To reject the scanned copy as displayed on the box and to get a new scan click the New Scan button.
14. Optional: You can adjust the image during the preview. (See Appendix B for information regarding the topics)
15. If you like the displayed scanned copy, click Accept button.
16. Wait a few moments for the Omnipage to load the document.
17. Perform OCR to convert the images of text into editable text characters and to check and correct errors in the document
18. This box should open.
Image
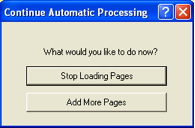
19. Click STOP LOADING PAGES.
20. Finally, the save-as box should open. (See below)
Image
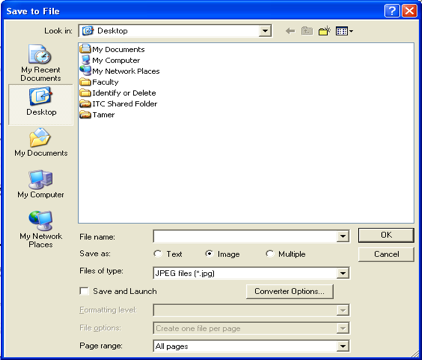
21. Select where you want to save your files.
22. Give a name to the file, save it as image; specify the format of the saved file as PDF/DOC/TIF in the “Files of Type” drop down list.
23. Click OK to save.
Activity 2: Scan a photograph Using Omni Page:
1. Follow steps 1-4 in Activity 1.
2. Click the giant 1 button to initiate scanning on the workflow bar. (See below)
Image

3. Follow steps 10-12 in Activity 1.
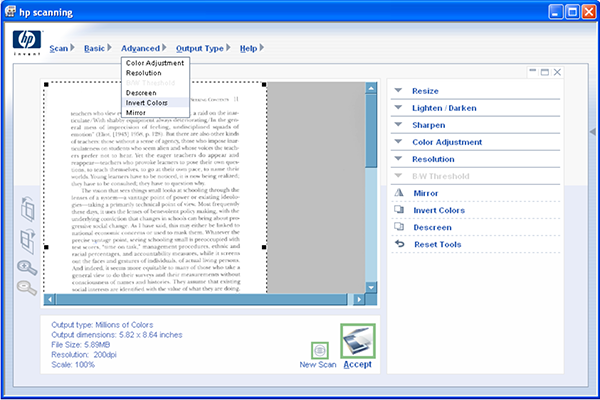
4. Set the picture options like Resize, Lighten/Darken, Sharpen, Color Adjustment, Resolution, Mirror, Invert Colors, Descreen. (See Appendix B for information regarding the topics)
5. Follow step 13-19 in Activity 1.
6. Give a name to the file, save it as image; specify the format of the saved file as JPEG/BMP/GIF in the “Files of Type” drop down list.
7. Click OK to save.
Image
Image
Activity 3: Modify the picture using Fireworks:
1. Open Macromedia Fireworks
2. Go to File>Open, to open your saved photograph.
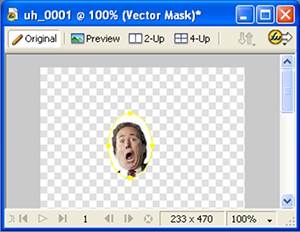
3. Masking Photograph:
a. Select an Eclipse tool in the Vector field.
b. Select a part of the image using the Eclipse tool.
c. Go to Edit>Cut to move the selected image to the Clipboard.
d. Select the photograph and select Edit>Paste as Mask.
Image
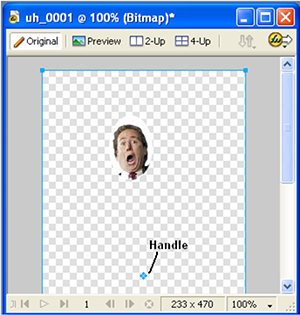
e. Click the image thumbnail on the Layers panel
f. Use the light blue handle to adjust the position under the mask.
Image
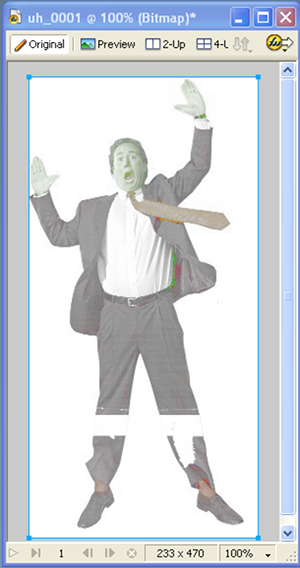
g. Save the file as a Fireworks PNG, this will let you edit it later
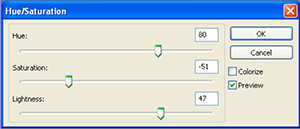
4. Adjust the color tone of the Photos:
a. Select the image for color adjustments.
b. Select Filters>Adjust Color>Hue/Saturation.
c. Drag the Hue, Saturation and Lightness sliders to adjust the color tone.
d. Select Colorize to adjust the general color.
Image
Image
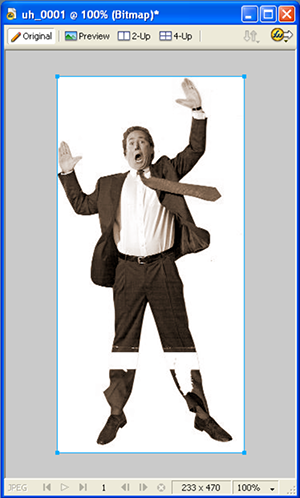
e. To apply an antiquated look, select Commands>Creative>Convert to Sepia tone.
Image
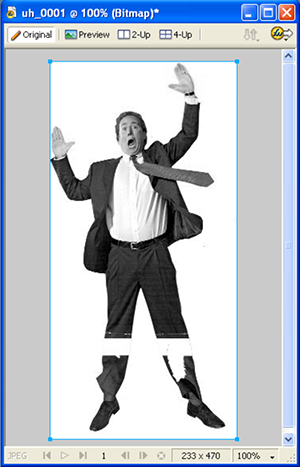
f. To make the photo black and white, select Commands>Creative>Convert to Grayscale.
Image
Appendix A: How to use visuals:
1. In Websites the resolution of the image files must be 72 DPI (Dots per Inch) and less than 500 pixels wide. Graphics files uploaded should be as small as possible. Large graphics should be less than 40KB to 50KB; smaller ones should be less than 7KB to 10KB in size.
2. In PowerPoint presentations the resolution must be a minimum of 72DPI and no larger than 150DPI. A resolution no larger than 1024x768 is recommended. Image files used for Power Points should be no larger than 200KB (To reduce the size of the image, it can be cropped to remove the parts that are not relevant) Power Points presentations to be uploaded online should have a recommended size between 4-10MB or less.
3. In Handouts, the resolution should be at least 150 DPI for a decent print where 300 DPI is usually preferred.
Appendix B: Adjusting an image during preview:
1. Resize - Resizing the scanned image to the actual dimensions before performing the final scan helps ensure the best image quality.
Click this icon
Image
to lock the output dimensions you defined so that you can change the selection area without changing the output dimensions. When you change the selection border, the software resizes the border proportionally. The output dimensions remain the same.
2. Lighten/Darken - The scanned image can be lightened or darkened by adjusting three variables: highlight, midtones, and shadows. The midtone setting lets you lighten or darken the middle values in an image. Moving toward 1.0 darkens the image and toward 4.0 lightens the image.
3. Sharpen - OmniPage automatically selects the optimal sharpen level. If the image looks fuzzy, you may increase the sharpness.
4. Color Adjustment - To correct undesirable color shifts or create special effects
5. Resolution - Select lower or higher resolutions keeping that in mind that selecting higher resolutions for color images increases file size but do not necessarily increase quality. If you double the resolution, the file size quadruples.
6. Mirror - You can mirror (reverse) an image from side to side on the vertical axis.
7. Invert Colors - Converts white areas of an image to black and black areas to white. In color images, a color is converted to its complementary color.
8. Descreen - Reduces undesirable patterns in printed items you are scanning. An example of an undesirable pattern is a moiré pattern, or the circles that often appear on pictures printed in newspapers. Scanning takes longer when this command is selected.
9. Reset Tools - The images can be reset to the optimal (default) values that the scanning software selected for the images that are based on the output type selected. Resetting removes all adjustments you have made except the output type, zoom level, and the selection area.